Annotating a Document
Annotations can only be added via the PC-Based viewer in Documents Online. The most common annotations will probably occur in the Document Capture application. Provided the user has sufficient privileges, the first step in the Annotation process is to put the Document into "Annotation Mode." This is done by clicking the "Enable Annotations" button in the toolbar.

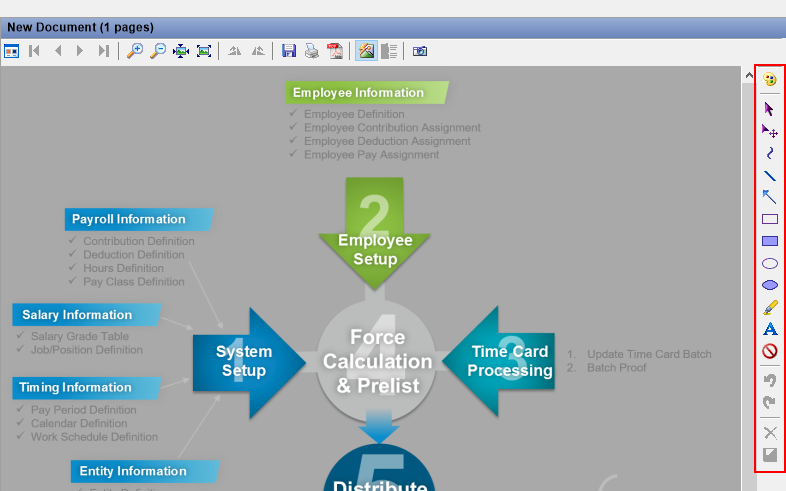
Once annotations have been enabled, the annotation toolbar will appear to the right-hand side of the image viewer. This toolbar contains a series of buttons used to annotate the image. For the most part, the Annotation editor functions just like most common PC-based drawing tools.
Toolbar
The following is a description of the annotation toolbar buttons.
 | Annotation Palette. This allows the default color, font, and pixel size to be set for annotation. |
 | Select Item. This option does not create any shapes or text and therefore is useful for selecting annotations on the image. |
 | Move Item. This option is used to move shapes that are part of the current annotation around the image. |
 | Freehand Line. This tool creates freehand lines on the document. |
 | Straight Line. This tool creates straight lines on the document. |
 | Arrow. This tool creates an arrow on the document. When drawing the arrow the ending point of the tool is the front of the arrow. |
 | Empty Box. This tool creates an empty box (square or rectangle) on the document. |
 | Filled Box. This tool creates a filled box (square or rectangle) on the document. |
 | Empty Ellipse. This tool creates an empty ellipse on the document. |
 | Filled Ellipse. This tool creates a filled ellipse on the document. |
 | Highlight Area. This tool creates a highlighted area on the document. The default color for the highlighter is Yellow. The tool functions in a way very similar to the Filled Box. |
 | Add Text. This tool adds text to the document. When in edit mode the text box appears in a colored box. This is to help distinguish the editing area from the potentially white background of a scanned page. When the text is saved (by clicking elsewhere on the document), the background becomes transparent. |
 | Redaction. This tool creates a redaction on the document. In this case, the only thing that is different between a redaction and a filled box is that the redaction always defaults to black. Whether or not an annotation is permanent is set when the annotation is saved. |
 | Undo Change. This option removes the last added annotation shape. |
 | Redo Change. This option restores the last annotation shape removed. |
 | Delete All Changes. This option permanently removes all of the marks from the annotation. |
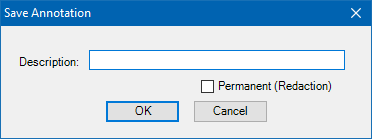
 | Save Changes. This option saves all of the annotations to a new annotation layer prompting the user for a description and whether or not they want the annotation to be permanent (redaction). |
Setting the Palette
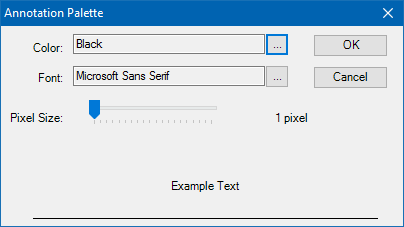
The first button in the Annotation toolbar is used to set the current default palette for the annotation. This dialog allows you to set the default color, font (font name, size and style) and the pixel size for any lines. You can change the default palette at any time you wish. Also, in the event you want to change the settings of an existing image you can use the Properties option to alter the palette settings of a specific Annotation mark.
Adding Annotation Marks
The drawing tools (Freehand Line, Straight Line, etc.) are used to modify the appearance of the document. These tools work like their counterparts in most common drawing applications. Once you have selected a drawing tool, the cursor changes to reflect the drawing tool type. Most tools work by clicking once to begin creating the image and then clicking again to finish the mark. The exceptions to this are the freehand tool, which draws from the time the left mouse button is pressed until it is released, and the "Add Text" tool that uses the left mouse button to select the upper left position of the text area.
Moving Annotation Marks
To move a mark to another location, select the "Move Item" tool from the Annotation toolbar and then click the Annotation Mark you wish to move. By holding the left mouse button down and dragging the mouse to the desired location, you will see a faint outline of the shape moving with the mouse. Releasing the left mouse button will redraw the mark in the new location.
Deleting an Annotation Mark
The last Annotation Mark that was added can be undone by the "Undo Change" button on the toolbar. However, in the event that a specific mark needs to be removed you can change the "Select Item" tool and use the left mouse button to select the mark. Then right clicking the mouse brings up the context menu for that shape. The "Delete" option allows you to delete that mark specifically. All of the Annotation marks can be deleted at once with the "Delete All Changes" option in the Annotation toolbar.
Altering an Annotation Mark
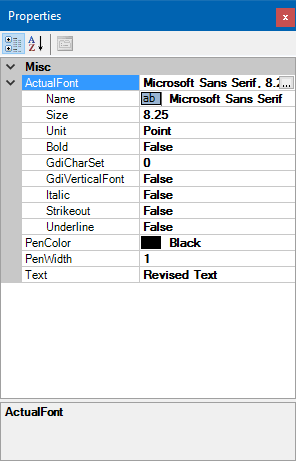
Most Annotation marks have a set of editable properties. Choosing the "Properties" option on the context menu displays a dialog that allows you to view and change the properties of that particular shape. Note that there is no "Save" button for the properties dialog. Once you are finished viewing or altering the properties, simply close the dialog with the red "X" in the upper right hand corner of the dialog box.
Saving the Annotation
Once you are done making the desired Annotation marks, you need to save them to a layer that can be applied the document page when viewed in the future. To do this, select the "Save Changes" option on the Annotation toolbar. This displays the "Save Annotation" dialog box. From here, you are required to give the annotation a description (the limit is 255 characters). You can also choose to make the Annotation "Permanent." By default, Annotations can be visually removed from the document page by the user while viewing the document page. This is helpful when the annotation covers something important on the printed version of the document page. By selecting "Permanent" on this dialog, the annotation is always applied to the document page and cannot be visually removed by the user. This is useful when the Annotation is covering sensitive information such as a Social Security number that should not be able to be visually removed by someone viewing the image. The only way to remove an Annotation is to use the Admin Console (with sufficient security) and to permanently delete the Annotation from the document.
Once the Annotation has been saved, the Annotation toolbar will disappear again. At this point, the Annotation marks have been written to a transparent image and stored in the database. The marks cannot be edited after this point. To add additional Annotation marks, you must enable Annotations again from the document page toolbar. Once there are Annotations on the document page the "View Annotations" button to the right of the "Enable Annotations" button in the toolbar becomes active. This means that there are Annotations on the document page. By selecting this dialog, any of the Annotations not marked as "Permanent" (redactions) can be unchecked and are visually removed from the document page.

The same option is also available in the Web-based document viewer. The difference is that it appears as a menu with check boxes. Simply checking the checkbox to the left of the Annotation description will visually remove the Annotation. Annotations marked as "Permanent" (redactions) cannot be removed and will appear in the menu as disabled items. This was done to indicate that there are alterations to the document page even if they cannot necessarily be removed.
Removing Annotations
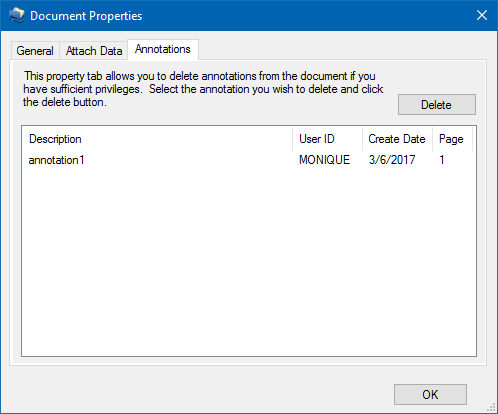
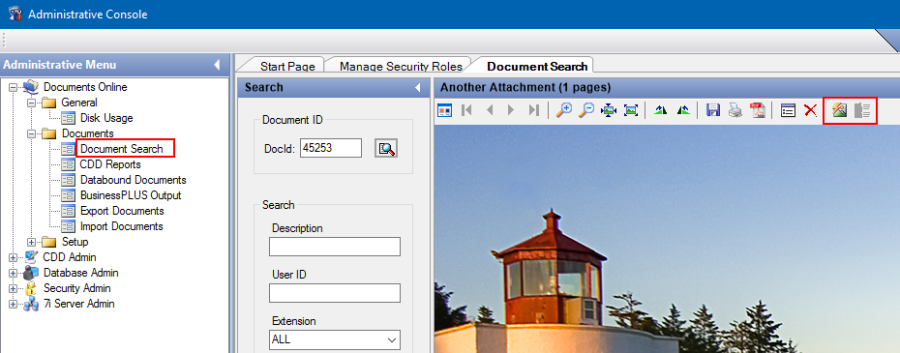
If an Annotation needs to be removed from a document, you can use the Admin Console to locate and delete the Annotation. This removal is permanent and cannot be recovered so that should be considered before performing this action. First, using any of the search options in the Admin Console locate the desired document and from the document page viewer select the Properties option from the toolbar. Then, select the "Annotations" tab from the document properties. From there you can select the Annotation you wish to delete and click the "Delete" button.
Note that the ability to delete Annotations or Redactions is controlled by Role-Based security.

