
Introduction
This documentation provides a comprehensive guide on integrating C# activities within the WF Designer. C# is a robust, object-oriented programming language widely used for developing a variety of applications. In contrast to VBScript which is a lightweight scripting language primarily used for automation tasks within Windows environments, C# requires assembly references and namespaces to structure and organize code. The WF Designer supports C#, enabling developers to leverage its powerful features for creating sophisticated workflows.
The training video is available on PowerSource and can be found here.
C# Activity
The C# activity for database-related operations (fetch, update, insert, and delete) only supports the tables that are present in the BusinessPlus database schema. Views or non-BusinessPlus tables are not supported.
How to add a C# Activity ?
In the Workflow designer application, select ‘C#’ as the action and select the ‘Settings’ button as shown in figures 1 and 2.
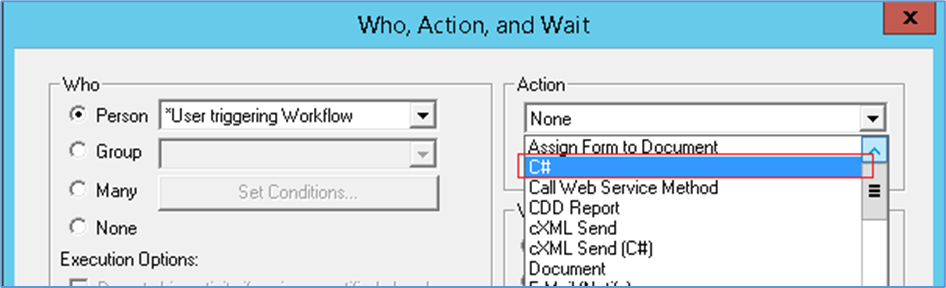
Figure 1: C# Activity
‘Run’ is the main function. Valid C# code can be added in this main function. Use the ‘Validate’ button to check if the code is valid or not. Selecting “Ok” will also validate the code and will report any error and will not save code until the error(s) are addressed.
The entire logic can be added to this main function body, but it is recommended to add more functions for the specific needs in order to better manage the code.
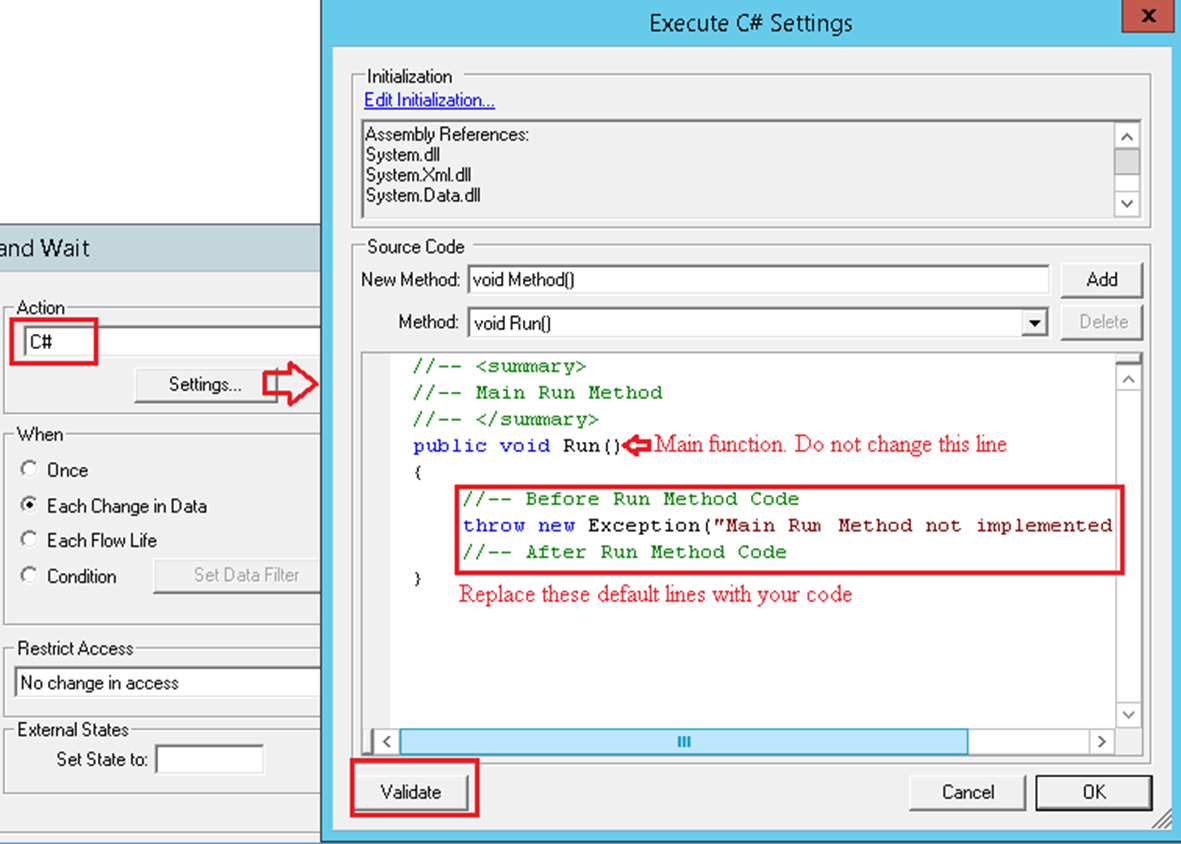
Figure 2: C# Main function
Assembly References
In VB-Script, there is no concept of assembly references because it runs within a host environment like Windows Script Host or Internet Explorer. However, in C#, assembly references are crucial for accessing libraries and frameworks that provide additional functionality.
Namespaces
VB-Script operates in a single global scope and does not have namespaces. In contrast, C# uses namespaces to organize code and prevent naming conflicts. Namespaces help in structuring code logically, making it easier to manage large projects.
Default Assembly References and Namespaces
When you add a C# activity, the following default assembly references and namespaces are included to help you get started: You can use the Edit Initialization link to modify these references and namespaces as needed.
-
Assembly References:
-
System.dll
-
System.Xml.dll
-
System.Data.dll
-
<InstallDrive>:\Program Files (x86)\PowerSchool\bin\IFAS.Interop.dll
-
<InstallDrive>:\Program Files (x86)\PowerSchool\bin\IFAS.Common.dll
-
<InstallDrive>:\Program Files (x86)\PowerSchool\bin\IFAS.Interop.BTContextLib.dll
-
<InstallDrive>:\Program Files (x86)\PowerSchool\bin\IFAS.Interop.BT20GLLib.dll
-
<InstallDrive>:\Program Files (x86)\PowerSchool\bin\IFAS.Interop.GLRecordDefs.dll
-
-
Namespaces:
-
System
-
System.Xml
-
System.Data
-
System.Collections.Generic
-
BT50WF.Managed
-
BT50WF.Managed.CSharp
-
BT50WF.Managed.WorkflowWrappers
-
IFAS.Interop.BT20WFLib
-
IFAS.Interop.BT20GLLib
-
IFAS.Interop.BTContextLib
-
IFAS.Interop
-
IFAS.Common
-
WhereSign = IFAS.Interop.BT20.EWHERECLAUSESIGN
-
WhereOperator = IFAS.Interop.BT20.EWHERECLAUSEOP
-
Technical Guide to Data Fetching, Insertion, Update, and Deletion Operations
The below sections helps in how to fetch data from any table using the provided data fetch logic. It covers various aspects such as declaring objects, listing columns to be fetched, applying filters, sorting, and handling SQL queries. Additionally, it includes examples for counting table records, using SQL functions like MAX, MIN, SUM, and performing operations like Group By and Having Count. The documentation also outlines methods for data insertion, updating, and deletion, ensuring that users can efficiently manage their data within tables.
-
Data fetch
Data from any IFAS table with the list of columns to fetch, for the given filters (if any) can be fetched using the data fetch logic given below:
//Declare the object with the table name
IFAS.Common.GenericBT20Object popPvDtl = new GenericBT20Object("pop_pv_dtl");
//List any number of columns to be fetched. At least one column name is required
popPvDtl.FetchColumns("Column1", "Column2", "Column3");
//Filters [Optional]
//One 'WhereCondition' call for each filter. Sign and Operator parameters are optional.
//Default sign is 'Equal', default operator is 'AND'
//Following two filter calls are exactly the same
popPvDtl.WhereCondition("ColumnA", "SomeValue");
popPvDtl.WhereCondition("ColumnA", "SomeValue", WhereSign.sign_equal, WhereOperator.eWhereAND);
//Few more filters. 'NotEqual', 'GreaterThan' and 'LessThanOrEqual'
popPvDtl.WhereCondition("ColumnB", "SomeValue", WhereSign.sign_ne);
popPvDtl.WhereCondition("ColumnC", "99", WhereSign.sign_gt);
popPvDtl.WhereCondition("ColumnD", "01/01/2015", WhereSign.sign_le);
//For complicated or mix of 'AND' & 'OR', plain text can be used for a valid ‘where’ condition
popPvDtl.WhereClause = "(ColumnE = 'A' or ColumnE = '' or ColumnE is null) AND ColumnF <= '12/31/2015'";
 //Sorting [Optional]
//[ColumnName [Optional Direction, Default is Asc]]. List any number of columns
popPvDtl.OrderByColumns("Column1 desc", "Column2");
The code above will result in the following SQL Query:
select Column1, Column2, Column3 from pop_pv_dtl
where ColumnA='SomeValue' and ColumnB <> 'SomeValue' and ColumnC > 99 and ColumnD <= '01/01/2015' and (ColumnE = 'A' or ColumnE = '' or ColumnE is null) AND ColumnF <= '12/31/2015'
order by Column1 desc, Column2

//Data (if fetched successfully), will be returned in DataTable object.
//Column names in this table will be the same as listed in the fetch list
//Data types will be string, DateTime and Decimal based upon the
//data types of the columns to be fetched
//In case of any error, an exception will be thrown
try
{
     //Set the user id if need to apply the security for the user in question[optional]
    string sActivityUser = Model.GetActivityUser();
     popPvDtl.IfasUserId = sActivityUser;
DataTable table = DataHelper.GetTableData(popPvDtl);
if (table.Rows.Count > 0)
{
//data from the first row (0 index based) for the given column
string str = table.Rows[0]["Column1"].ToString();
}
//or
foreach (DataRow row in table.Rows)
{
string str = row["ColumnA"].ToString();
int n1 = Convert.ToInt32(row["ColumnB"]); //unsafe to use if value is not numeric
int n2;
if (!int.TryParse(row["ColumnA"].ToString(), out n2))   //Better
{
//"invalid numeric value for ColumnA"
}
else
{
//use n2
}
int n3 = BTHelper.To<int>(row["ColumnA"]);// Best
}
}
catch (Exception e)
{
Model.WriteTrace(e.Message); //This trace will be added to BT60WF trace module
return; //abort
}
More details about the processing, SQL query and exceptions will be logged in the trace file for BT60WF
-
All signs and operations
Various values for WhereSign are:
sign_equal, sign_lt, sign_gt, sign_le, sign_ge, sign_ne, sign_in, sign_like, sign_isnull, sign_isnotnull, sign_notlike
sign_equal is the default value
Values for WhereOperator are:
eWhereAND, eWhereOR
eWhereAND is the default value if not used
-
Table Records Count
SQL Query like
“select count(*) from Table_Name where ColumnA=’SomeValue’ and ColumnB <> ‘SomeValue’” can be accomplished as:
IFAS.Common.GenericBT20Object popPvDtl = new GenericBT20Object("pop_pv_dtl");
popPvDtl.WhereCondition("ColumnA", "SomeValue");
popPvDtl.WhereCondition("ColumnB", "SomeValue", WhereSign.sign_ne);

//Set the user id if need to apply the security for the user in question[optional]
popPvDtl.IfasUserId = sActivityUser;
int nCount = DataHelper.GetRecordCount(popPvDtl);
Model.WriteTrace("Found " + nCount + " records");
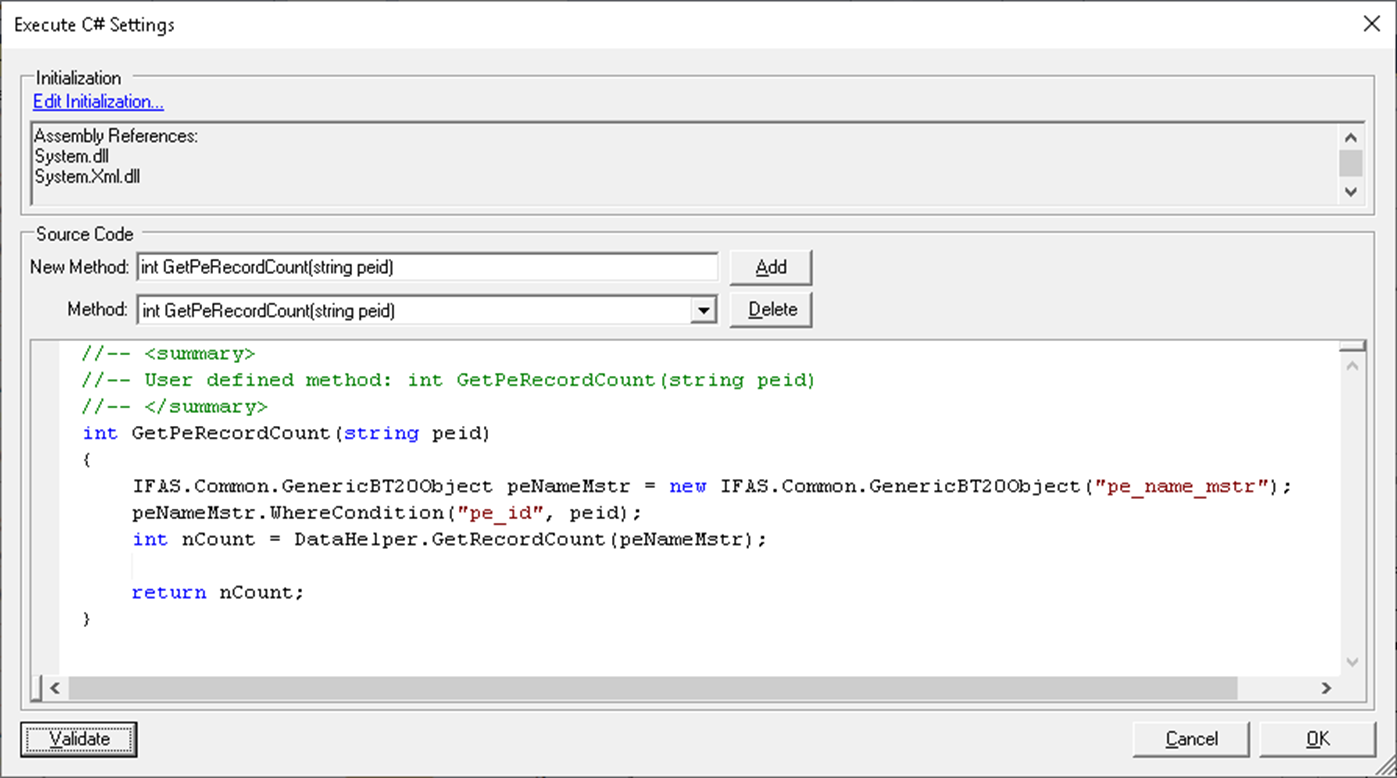
Figure 3: Body of Record Count Function with code
Data Fetch using SQL Functions MAX, MIN, SUM
Sum, Max and Min functions are supported for the data fetch columns.
Example:
IFAS.Common.GenericBT20Object popPvDtl = new GenericBT20Object("pop_pv_dtl");
popPvDtl.FetchColumns("sum(Column1)", "max(Column2)", "min(Column3)");
popPvDtl.WhereCondition("ColumnA", "SomeValue");//optional
try
{
//Set the user id if need to apply the security for the user in question[optional]
     popPvDtl.IfasUserId = sActivityUser;
DataTable table = DataHelper.GetTableData(popPvDtl);
if (table.Rows.Count > 0)
{
decimal sum = BTHelper.To<decimal>(table.Rows[0]["Column1"].ToString());
string max = table.Rows[0]["Column2"].ToString();
}
}
catch (Exception e)
{
Model.WriteTrace(e.Message); //This trace will be added to BT60WF trace module
return; //abort
}
Data Fetch using Group by, Having Count
SQL Query like “select Column1, Column2, Column3 from Table_Name where ColumnA='SomeValue' and ColumnB <> 'SomeValue'
Group by Column1, Column2, Column3 Having Count(*) > 1”
Can be accomplished using the code below:
IFAS.Common.GenericBT20Object popPvDtl = new GenericBT20Object("pop_pv_dtl");
popPvDtl.FetchColumns("Column1", " Column2", " Column3");
popPvDtl.WhereCondition("ColumnA", "SomeValue");
popPvDtl.GroupBy("Column1", " Column2", " Column3");
//Set the user id if need to apply the security for the user in question[optional]
string sActivityUser = Model.GetActivityUser();
popPvDtl.IfasUserId = sActivityUser;
DataTable table = DataHelper.GetTableData(popPvDtl);
Model.WriteTrace(string.Format("Found {0} rows", table.Rows.Count));
foreach(DataRow row in table.Rows)
{
int nCount = BTHelper.To<int>(row["Count"].ToString());
if(nCount > 1)
{
Model.WriteTrace(row["Column1"].ToString());
//do something
}
}
When ‘GroupBy’ method is used, the process will automatically add column ‘Count’ to the DataTable returned by GetTableData. The table will have all rows with Count 1 and higher. User need to manually check each row to see what is the Count value of that row.
Other operations can be performed on the table object to find the desired data as:
DataRow[] rows = table.Select("Count > 1");
foreach (DataRow row in rows)
{
//do something here
}
Data Fetch using SQL statement
A built-in function call is available to fetch data with SQLstatements which returns DataTable with rows (if any)
string sSql = "select columnA, columnB from some_table where some_condition";
DataTable myDataTable = DataHelper.GetTableDataDirectFetch(sSql);
foreach (DataRow row in myDataTable .Rows)
{
string a = row[“columnA“].ToString();
}
Reading data values from the nested child nodes (tables)
A given BT20 object (BT20.POPPvDetail for example) may have multiple child and grand-child nodes. Built-in ‘Model’ calls provides a mechanism to get the count of the child node and the value of given attribute(prop) of the node in question. ‘Model.GetNodeCount’ will provide the integer value of how many nodes (records) are there for the given fully qualified child node data source. ‘Model.GetPropValue’ will provide the string value of the nth child node of then given fully qualified child node data source.
Example:
string sItemDetailSource = "//BT20.POPPvDetail/BT20.POIItemDetail";
string sPeNameSource = "//BT20.POPPvDetail/BT20.PENameMaster";
string sEnDetailSource = "//BT20.POPPvDetail/BT20.POIItemDetail/BT20.PONEnDetail";
int nItemsCount = Model.GetNodeCount(sItemDetailSource);
for(int n = 0; n < nItemsCount; n++)
{
	sGlKey = Model.GetPropValue(sItemDetailSource, n, "GlKey");
	if(sGlKey == "GL")
	{
		//do something
	}
}
int nPeCount = Model.GetNodeCount(sPeNameSource);
for(int n = 0; n < nPeCount; n++)
{
	sPeId = Model.GetPropValue(sPeNameSource, n, "PeId");
	if(sPeId == "abc")
	{
		//do something
	}
}
int nEnCount = Model.GetNodeCount(sEnDetailSource);
for(int n = 0; n < nEnCount; n++)
{
	sPercent = Model.GetPropValue(sEnDetailSource, n, "Percent");
	int nPercent = BTHelper.To<int>(sPercent);
	if(nPercent < 100)
	{
		//do something
	}
}
Data Update
Any IFAS table data can be updated using the code logic like given below. All values must be in the string type. Quotes, apostrophes in the data values should be properly escaped for a valid query statement.
Example Code:
IFAS.Common.GenericBT20Object popPvDtl = new GenericBT20Object("pop_pv_dtl");
popPvDtl.SetColumn("Column1","value");     //at least one required
popPvDtl.SetColumn("Column2", "245.25");
popPvDtl.SetColumn("Column3", "07/01/2019");
popPvDtl.WhereCondition("ColumnA", "SomeValue");//required
 //Set the user id if need to apply the security for the user in question[optional]
string sActivityUser = Model.GetActivityUser();
popPvDtl.IfasUserId = sActivityUser;
int nUpdated = DataHelper. UpdateData(popPvDtl);
If the workflow model needs to be triggered, use the following method call instead:
int nUpdated = DataHelper UpdateDataTriggerWorkflow(popPvDtl);
Model.WriteTrace("updated " + nUpdated + "records");
Data Insert
Data insert in any IFAS table is simple, just like update. User needs to make sure all the required columns are included. If there is any foreign key constraint, the insert may fail.
Example Code:
IFAS.Common.GenericBT20Object popPvDtl = new IFAS.Common.GenericBT20Object("pop_pv_dtl");
popPvDtl.InsertColumn("Column1", "value1");
popPvDtl.InsertColumn("Column2", "95.50");
popPvDtl.InsertColumn("Column3", "01/01/2015");
popPvDtl.InsertColumn("Column4", "1");
try
{
//Set the user id if need to apply the security for the user in question[optional]
     string sActivityUser = Model.GetActivityUser();
     popPvDtl.IfasUserId = sActivityUser;
     DataHelper.InsertData(popPvDtl);
//If workflow model related to the table in question needs to be triggered, then use the following method call instead:
     DataHelper.InsertDataTriggerWorkflow(popPvDtl);
}
catch(Exception e)
{
     Model.WriteTrace(e.Message);
}
Data Delete
Any IFAS table data can be deleted using the code logic like given below. Second parameter value of ‘DELETE’ is required during the declaration of the BT20 object to make sure user is aware that invoke the ‘Delete’ call was intentional.
Example Code:
IFAS.Common.GenericBT20Object popPvDtl = new GenericBT20Object("pop_pv_dtl", "DELETE");
popPvDtl.WhereCondition("ColumnA", "SomeValue");//required
try
{
//Set the user id if need to apply the security for the user in question[optional]
     string sActivityUser = Model.GetActivityUser();
     popPvDtl.IfasUserId = sActivityUser;
     DataHelper. DeleteData(popPvDtl);
//If workflow model related to the table in question needs to be triggered, then use the following method call instead:
     DataHelper. DeleteDataTriggerWorkflow(popPvDtl);
}
catch(Exception e)
{
     Model.WriteTrace(e.Message);
}
Adding New Custom Functions
Add the return type (void, int, string, DataTable, decimal etc) of the custom function, name of the function, and any parameter that are being passed to in the ‘New Method’ field and select ‘Add’ button
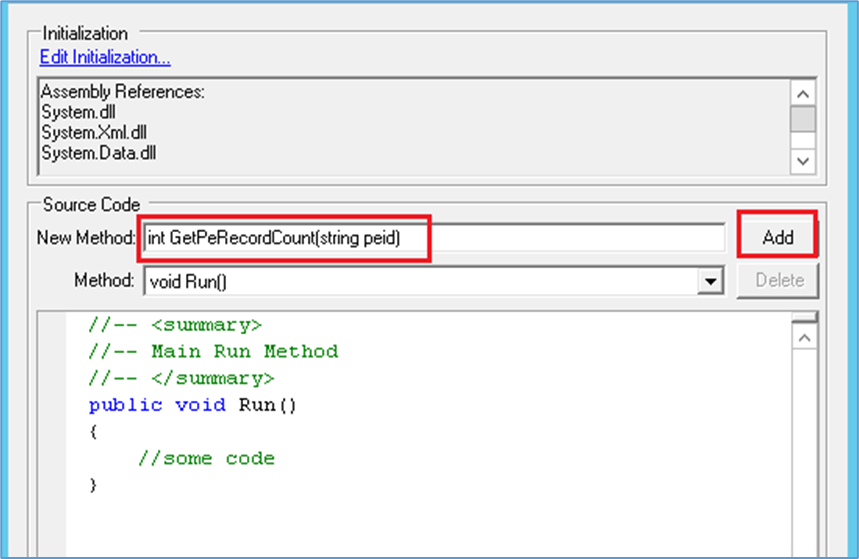
Figure 4: Adding new method/function
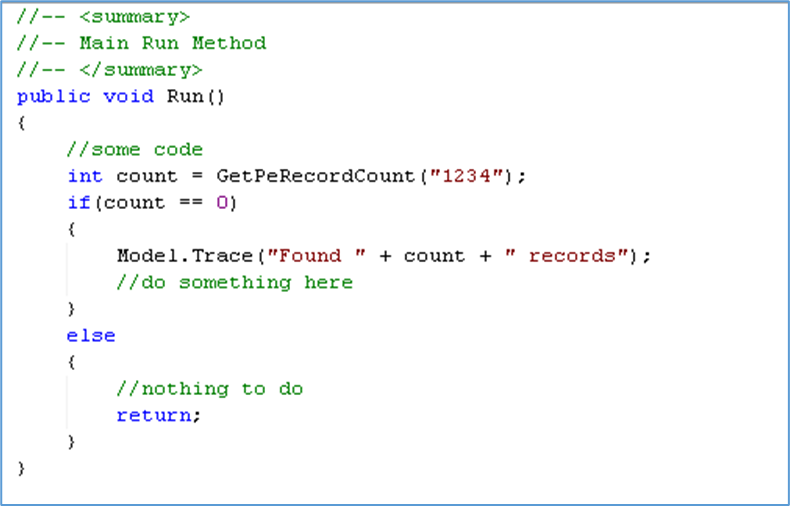
Figure 5: Calling custom method from main
Helper Functions
Model Helper Function
The Model helper function provides access to several useful methods for interacting with the workflow. Examples of how these functions are used can be found in the stock workflow models that have already been converted to C#. These functions can be called using “Model.SomeFunctionNameHere” format. Some of these functions are:
-
WriteTrace: Logs trace statements for debugging and monitoring.
-
GetInstanceRecord: Retrieves the current instance record.
-
GetInstanceData: Fetches data related to the current instance.
-
GetHistoryCount: Returns the count of historical records for the current instance.
-
GetActivityUser Get the id of the user that was assigned to this activity.
-
GetCreator Get the id of the creator of this instance of the model.
-
GetFinalApprover Get the user id of the final approver of the instance.
-
GetWebrqbUrl Get the url of the 7i web server to send a request to.
-
GetConnectionName Get the BusinessPlus application connection name that can be used in the request to be sent to the 7i web server.
-
SendRequest Send a fully constructed request to the 7i web server.
Trace Statements
Trace statements are used to log information during the execution of a program. They are invaluable for debugging and monitoring the application's behavior. By adding trace statements, developers can understand the flow of execution and identify issues by logging specific information at various points in the code.
To enable tracing and configure the BT60WF module in the registry, follow these steps:
-
Open the Registry Editor:
-
Press
Win + Rto open the Run dialog. -
Type
regeditand press Enter.
-
-
Navigate to the relevant registry key:
-
For enabling trace, navigate to the key where tracing settings are stored.
HKEY_LOCAL_MACHINE\SOFTWARE\WOW6432Node\BiTech\Common\Trace.
-
-
Enable Trace:
-
Find the Enable entry.
-
Set its value to
1. -
Find the FilePath entry.
-
Set its value to a folder eg: E:\Trace.
-
-
Enable BT60WF module:
-
Navigate to the key for the
HKEY_LOCAL_MACHINE\SOFTWARE\WOW6432Node\BiTech\Common\Trace\Modules. -
Find the
BT60WFentry. Add this if not available. -
Set its value to
ff.
-
-
Save and exit:
-
Close the Registry Editor.
-
-
Restart WF Engine
To add a trace statement, you can use the following code:
Model.WriteTrace("My First Trace...");
Save the WorkFlow Model
This line will log the message "My First Trace..." during the execution of your program. The log file will be generated in the trace directory specified in the registry settings.
Identify Workflow Model in Trace:
Since there will be many workflow models, their C# activities will be adding to the trace file, making it difficult to track which trace line is from which model. Therefore, add the following line as the first line in the beginning of the C# activity (just one activity that will be executed first; it will not cause any issue if you set it in all activities). This will add the name of the workflow model to the trace line so that you can tell which model it is from:
Model.ModelId = "workflow model name in question";
or
use these two lines to set the correct name of the model in question:
WFInstance wfInstance = Model.GetInstanceRecord();
Model.ModelId = wfInstance.ModelId;
Create Separate Trace File:
To avoid adding the trace to the general engine trace (BT60WF), set the following flag to true in the beginning of the first C# activity of the model:
Model.CreateSeparateTraceFile = true;
This will create a trace file named “WfModelTrace_1234.txt” (where 1234 is the engine id) under the trace folder. Enable is needed to be set to 1. No module is required to be enabled. A new file with a new process id will be created once you restart the workflow engine.
Code Samples
Data Fetch
The below code fetches data from cd_codes_mstr table, with columns cd_gr, cd_category, cd_descs,cd_code
where cd_code= THOMS
public void Run()
{
    WFInstance wfInstance = Model.GetInstanceRecord();
    Model.ModelId = wfInstance.ModelId;
    Model.CreateSeparateTraceFile = true;
    Model.WriteTrace("Starting Reading cd_codes_mstr");
    IFAS.Common.GenericBT20Object cdCodesMstr = new GenericBT20Object("cd_codes_mstr");
    cdCodesMstr.FetchColumns("cd_gr", "cd_category", "cd_descs", "cd_code");
    cdCodesMstr.WhereCondition("cd_code", "THOMS");
    try
    {
        Model.WriteTrace("Before Executing");
        DataTable table = DataHelper.GetTableData(cdCodesMstr);
        if (table.Rows.Count > 0)
        {
            Model.WriteTrace("Rows Count" + table.Rows.Count);
            //data from the first row (0 index based) for the given column
            string cdCode = table.Rows[0]["cd_code"].ToString();
			string cdGr = table.Rows[0]["cd_gr"].ToString();
			string cdCategory = table.Rows[0]["cd_category"].ToString();
            Model.WriteTrace("CD Code  : " + cdCode);
			Model.WriteTrace("Ledger  : " + cdGr);
			Model.WriteTrace("Code CateGory  : " + cdCategory);
        }
    }
    catch (Exception e)
    {
        Model.WriteTrace(e.Message); //This trace will be added to BT60WF trace module
        return; //abort
    }
}
Data Insert
public void Run()
{
    WFInstance wfInstance = Model.GetInstanceRecord();
    Model.ModelId = wfInstance.ModelId;
    Model.CreateSeparateTraceFile = true;
    Model.WriteTrace("Starting Inserting data to  cd_codes_mstr");
    IFAS.Common.GenericBT20Object cdCodesMstr = new GenericBT20Object("cd_codes_mstr");
	cdCodesMstr.InsertColumn("cd_gr", "@@");
    cdCodesMstr.InsertColumn("cd_category", "THOM");
    cdCodesMstr.InsertColumn("cd_code", "THOMS");
	cdCodesMstr.InsertColumn("cd_descs", "Common Code");
	string sActivityUser = Model.GetActivityUser();
	cdCodesMstr.IfasUserId = sActivityUser;
    try
    {
        Model.WriteTrace("Before Executing");
        DataHelper.InsertData(cdCodesMstr);
        Model.WriteTrace("Data Inserted successFully : ");
    }
    catch (Exception e)
    {
        Model.WriteTrace(e.Message); //This trace will be added to BT60WF trace module
        return; //abort
    }
}
Data Update
public void Run()
{
   WFInstance wfInstance = Model.GetInstanceRecord();
    Model.ModelId = wfInstance.ModelId;
    Model.CreateSeparateTraceFile = true;
    Model.WriteTrace("Starting Updating data to  cd_codes_mstr");
    IFAS.Common.GenericBT20Object cdCodesMstr = new GenericBT20Object("cd_codes_mstr");
	cdCodesMstr.SetColumn("cd_descs", "New Code");
	cdCodesMstr.WhereCondition("cd_code", "THOMS");//required
    try
    {
        Model.WriteTrace("Before Executing");
        int nUpdated = DataHelper.UpdateData(cdCodesMstr);
        Model.WriteTrace("updated " + nUpdated + " records");
    }
    catch (Exception e)
    {
        Model.WriteTrace(e.Message); //This trace will be added to BT60WF trace module
        return; //abort
    }
}
Data Delete
public void Run()
{
    WFInstance wfInstance = Model.GetInstanceRecord();
    Model.ModelId = wfInstance.ModelId;
    Model.CreateSeparateTraceFile = true;
    Model.WriteTrace("Starting Deleting cd_codes_mstr");
    IFAS.Common.GenericBT20Object cdCodesMstr = new GenericBT20Object("cd_codes_mstr", "DELETE");
    cdCodesMstr.WhereCondition("cd_code", "THOMS");
    try
    {
        Model.WriteTrace("Before Executing");
        DataHelper.DeleteData(cdCodesMstr);
        Model.WriteTrace("Data Deleted successFully");
    }
    catch (Exception e)
    {
        Model.WriteTrace(e.Message); //This trace will be added to BT60WF trace module
        return; //abort
    }
  }
Send Job Request
void SendJobRequest()
{
Model.WriteTrace("Sending POPO job request...");
string sPRNumber =  "PRNumber"
string sPOPrintDate = "PrintDate";
string sPRSeed = "PRSeed";
string sApprover = "User";
string sConnection = Model.GetConnectionName();
string sXmlRequest = "<NetSightMessage>";
sXmlRequest += "<Header>";
sXmlRequest += "<CurrentLedgers GL=\\"GL\\" JL=\\"--\\"/>";
sXmlRequest += "<UserID>" + sApprover + "</UserID>";
sXmlRequest += "<Connection>" + sConnection + "</Connection>";
sXmlRequest += "<RequestInfo/>";
sXmlRequest += "</Header>";
sXmlRequest += "<Request Type=\\"NucleusLaunch\\">";
sXmlRequest += "<NucleusLaunch Mask=\\"POPO\\" JobPri=\\"08\\">";
sXmlRequest += "<Question No=\\"SY01\\" Response=\\"PO\\" EchoPrefix=\\"System\\" EchoResponse=\\"Purchasing\\"/>";
sXmlRequest += "<Question No=\\"PO01\\" Response=\\"PO\\" EchoPrefix=\\"Purchasing Function\\" EchoResponse=\\"Print Purchase Orders\\"/>";
sXmlRequest += "<Question No=\\"PO0D\\" Response=\\"PO\\" EchoPrefix=\\"Format Code\\" EchoResponse=\\"PO Format\\"/>";
sXmlRequest += "<Question No=\\"PO20\\" Response=\\"" + sPOPrintDate + "\\" EchoPrefix=\\"Purchase Order Date\\" EchoResponse=\\"" + sPOPrintDate + "\\"/>";
sXmlRequest += "<Question No=\\"PO21\\" Response=\\"PR\\" EchoPrefix=\\"Print by\\" EchoResponse=\\"Purchase Request number\\"/>";
sXmlRequest += "<Question No=\\"PA1A\\" Response=\\"" + sPRNumber + "\\" EchoPrefix=\\"Purchase Request Number\\" EchoResponse=\\"" + sPRNumber + "\\"/>";
sXmlRequest += "<Question No=\\"SY03\\" Response=\\"01ARCHIVE 08\\" EchoPrefix=\\"FP Copies Name Pri and Option\\" EchoResponse=\\"01ARCHIVE 08\\"/>";
sXmlRequest += "<Question No=\\"PO24\\" Response=\\"NO\\" EchoPrefix=\\"Daisy Chain\\" EchoResponse=\\"NO\\"/>";
sXmlRequest += "<Question No=\\"PE12\\" Response=\\"NO\\" EchoPrefix=\\"Print Labels\\" EchoResponse=\\"NO\\"/>";
sXmlRequest += "<Question No=\\"PO11\\" Response=\\"03\\" EchoPrefix=\\"Selection Criteria\\" EchoResponse=\\"03\\"/>";
sXmlRequest += "<Question No=\\"PO0Y\\" Response=\\"" + sPRSeed + "\\" EchoPrefix=\\"PO Sequence identifier\\" EchoResponse=\\"" + sPRSeed + "\\"/>";
sXmlRequest += "</NucleusLaunch>";
sXmlRequest += "</Request>";
sXmlRequest += "</NetSightMessage>";
sXmlRequest += "</sbixml>";

XmlDocument xmlResponse = Model.SendRequest(sXmlRequest);
XmlNodeList errorNodes = xmlResponse.SelectNodes("//Errors/Error");
if(errorNodes == null || errorNodes.Count == 0)
{
	XmlNode jobNode = xmlResponse.SelectSingleNode("//Response/JobInfo");
	string sJobNumber = BTHelper.GetAttributeValue(jobNode, "IfasJobno");

	Model.WriteTrace(string.Format("Job number: '{0}'", sJobNumber));

	return true;
}

Model.WriteTrace("Job request failed");

string sSubject = "POPO Run Errors";
string sMessage  = "POPO Errors Encountered During Run\\r\\n\\r\\n";
sMessage += "-------------------------------------------------------------------------------------------\\r\\n\\r\\n";
foreach(XmlNode node in errorNodes)
{
	sMessage += node.InnerText;
	Model.WriteTrace(node.InnerText);
}
}
Creating a wf_queue record
void CreateQueueRecord()
{
Model.WriteTrace("Starting 'Create wf_queue record' activity...");
WFQueue wfQueue = new WFQueueClass();
wfQueue.Creator = "BSI"; //Source.UpdateUser;
wfQueue.Object = "BT20.POPPvDetail"; //BT20.IMInfo, BT20.GLBABatchMaster, BT20.HREmpmstr, BT20.OHBirMaster
wfQueue.EventId = "UPDATE";
wfQueue.Key = Guid.NewGuid().ToString();//Source.UniqueKey;
wfQueue.Start = DateTime.Now;
wfQueue.ProcessingEng = "NONE";
string sXml = "&lt;xml&gt;";
sXml += "&lt;bt20data&gt;&lt;BT20.POPPvDetail PrPrefix=\"PR\" PrNo=\"ALP13\" PoPrefix=\"PO\"&gt;&lt;/BT20.POPPvDetail&gt;&lt;/bt20data&gt;";
sXml += "&lt;OrigRec&gt;&lt;BT20.POPPvDetail PrPrefix=\"PR\" PrNo=\"ALP13\"&gt;&lt;/BT20.POPPvDetail&gt;&lt;/OrigRec&gt;";
sXml += "&lt;/xml&gt;";
if(Model.SetQueueBlob(wfQueue, sXml))
{
wfQueue.InsertRec();
//Commit();
Model.WriteTrace("wf_queue record created for POPPvDetail with event: 'UPDATE'");
}
else
{
Model.WriteTrace("Error: Unable to create wf_queue record for POPPvDetail with event: 'UPDATE'");
}
}
Creating Workflow Instance record (for web forms)
void CreateInstanceRecord()
{
Model.WriteTrace("CreateInstanceRecord");
//=== Load name and version of the workflow model
//=== that we are creating the Queue, and Instance record for
try
{
Model.LoadModel("TRAVEL_ADVANCE",2);
}
catch(Exception e)
{
Model.WriteTrace(e.Message);
return;
}
//=== Create the data values for wf_queue record (except the blob content)
WFQueue wfQueue = new WFQueueClass();
wfQueue.Creator = "BSI"; // any UserId
wfQueue.Object = "WebForm"; // other options: BT20.IMInfo, BT20.POPPvDetail, BT20.HREmpmstr, BT20.OHBirMaster
wfQueue.EventId = "INSERT"; // UPDATE, DELETE
wfQueue.Key = Guid.NewGuid().ToString();
wfQueue.Start = DateTime.Now;
wfQueue.ProcessingEng = "NONE";
//=== Now create the blob content (for webform based model)
string sInstanceDescription = "Test Model";
string sDesc = "xyz";
string sBatchId = "AP0001";
string sEmail = "bsi@powerschool.com";
string sXml = "&lt;xml&gt;&lt;model_id&gt;TEST_MODEL&lt;/model_id&gt;";
sXml += "&lt;description&gt;" + sInstanceDescription + "&lt;/description&gt;";
sXml += "&lt;WebformData&gt;&lt;CardHolder&gt;" + sDesc + "&lt;/CardHolder&gt;";
sXml += "&lt;BatchID&gt;" + sBatchId + "&lt;/BatchID&gt;";
sXml += "&lt;EmailAddress&gt;" + sEmail + "&lt;/EmailAddress&gt;";
sXml += "&lt;Filler&gt;Some other values here&lt;/Filler&gt;";
sXml += "&lt;/WebformData&gt;&lt;/xml&gt;";
try
{
//=== Create a new wf_instance record for the webform model
Model.WriteTrace("Trying to set blob content for the wf_queue record...");
Model.SetQueueBlob(wfQueue, sXml);
Model.WriteTrace("Trying to create new wf_instance from the wf_queue record...");
Model.CreateNewInstance(wfQueue, DateTime.Now);
Model.WriteTrace("New instance created");
}
catch(Exception e)
{
Model.WriteTrace("Error: " + e.Message);
}
}
Read Errors from the Business Rules
void GetErrors()
{
string sError = "";
bool bErrorFound = false;
object objErrorContainer = new object();
IFAS.Interop.BTContext.BTGetCurrentErrorContainer(ref objErrorContainer);
if (objErrorContainer is IFAS.Interop.BTContextLib.IBTErrorContainer)
{
IFAS.Interop.BTContextLib.IBTErrorContainer btErrorContainer = (IFAS.Interop.BTContextLib.IBTErrorContainer)objErrorContainer;
int errorCount = btErrorContainer.GetErrorCount(IFAS.Interop.BTContextLib.eBTErrorLevel.BTERROR_BLOCK, IFAS.Interop.BTContextLib.eBTErrorState.BTERROR_STATE_ALL);
if (errorCount &gt; 0)
{
bErrorFound = true;
for (int n = 0; n &lt; errorCount; ++n)
{
IFAS.Interop.BTContextLib.BTError btError = btErrorContainer.GetError(n);
if(sError != "") sError += "\r\n";
sError += btError.ErrorMessage;
}
btErrorContainer.NewUIEvent();
btErrorContainer.ClearErrors(IFAS.Interop.BTContextLib.eBTErrorLevel.BTERROR_BLOCK);
btErrorContainer.ClearErrors(IFAS.Interop.BTContextLib.eBTErrorLevel.BTERROR_WARN);
}
}
if(bErrorFound)
{
Model.WriteTrace(sError);
}
/*NOTE:
Need to include
IFAS.Interop.BTContextLib.dll
Need to use
IFAS.Interop.BTContextLib
*/
}
Miscellaneous Model Calls
void MiscModelCalls()
{
Model.Pending = true;//or false
XmlDocument xmlDoc = Model.GetInstanceData();
string sInstanceData = Model.GetInstanceDataText();
bool bResult = Model.SetInstanceData(xmlDoc);
bResult = Model.SetInstanceData(sInstanceData);
WFInstance wfInstanceRecord = Model.GetInstanceRecord();
Model.ModelId = wfInstanceRecord.ModelId;
Model.CreateSeparateTraceFile = true;//By defaultit is false
string sFinalApprover = Model.GetFinalApprover();
//Email to one recipient
Model.Mail("To@abc.com", "Subject", "Email message");
//Email to multiple recipients
Model.Mail("To1@abc.com,To2@abc.com,To3@abc.com", "Subject", "Email message");
//Email with Cc and Bcc options. Use a blank value for Cc and/or Bcc if not applicable
Model.Mail("To@abc.com", "Cc@abc.com", "Bcc@abc.com", "Subject", "Email message");
//Multiple recipients for To, Cc and Bcc
Model.Mail("To1@abc.com,To2@abc.com,To3@abc.com",
"Cc1@abc.com,Cc2@abc.com,Cc3@abc.com",
"Bcc1@abc.com,Bcc2@abc.com,Bcc3@abc.com", "Subject", "Email message");
//Apply Html Format (true/false) to the email body [Optional, Default is false]
Model.Mail("To@abc.com", "", "", "Subject", "Email message", true);
Model.SetCurrentIFASUser("BSI");
string sUrl = Model.GetWebrqbUrl(); //Get the Url for '/isapi/btwebrqb.dll'
string sConectionName = Model.GetConnectionName();
string sCreatorId = Model.GetCreator();
string sActivityUserId = Model.GetActivityUser();
int nHistoryCount = Model.GetHistoryCount();
for(int n = 0; n &lt; nHistoryCount; n++)
{
WFHistory historyRecord = Model.GetHistoryItem(n);
string sUserId = historyRecord.UsId;
string StatusCode = historyRecord.Status;
string sHistoryId = historyRecord.ActivityId;
}
}
Extract Unique Key After Insert Operation
void InsertRecord()
{
    IFAS.Common.GenericBT20Object cdCodesMstr = new GenericBT20Object("cd_codes_mstr");
	cdCodesMstr.InsertColumn("cd_gr", "@@");
    cdCodesMstr.InsertColumn("cd_category", "TOHM");
    cdCodesMstr.InsertColumn("cd_code", "THOMS");
	cdCodesMstr.InsertColumn("cd_descs", "Common Code");
	string sActivityUser = Model.GetActivityUser();
	cdCodesMstr.IfasUserId = sActivityUser;
    try
    {
        DataHelper.InsertData(cdCodesMstr);
		Model.WriteTrace("Data Inserted successFully : ");
		cdCodesMstr.FetchColumns("unique_key");
		cdCodesMstr.WhereCondition("cd_category", "TOHM");
		cdCodesMstr.WhereCondition("cd_code", "THOMS");
		cdCodesMstr.WhereCondition("cd_gr", "@@");
		DataTable table = DataHelper.GetTableData(cdCodesMstr);
		if (table.Rows.Count > 0)
        {
		string unique_key = table.Rows[0]["unique_key"].ToString();
        Model.WriteTrace("CD unique_key  : " + unique_key);
		}
    }
    catch (Exception e)
    {
        Model.WriteTrace(e.Message); //This trace will be added to BT60WF trace module
        return; //abort
    }
}
How to Load a C# WorkFlow Model
Step – 1
-
Logging into Workflow designer and setting the model status to Inactive, verify the version and Save.
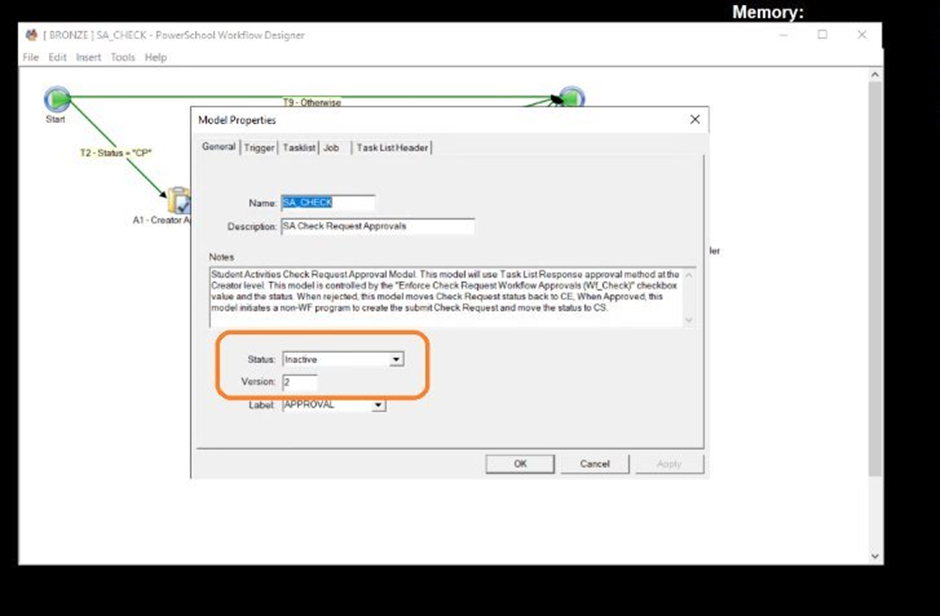
Step – 2
-
Import the C# model using Import option under files.
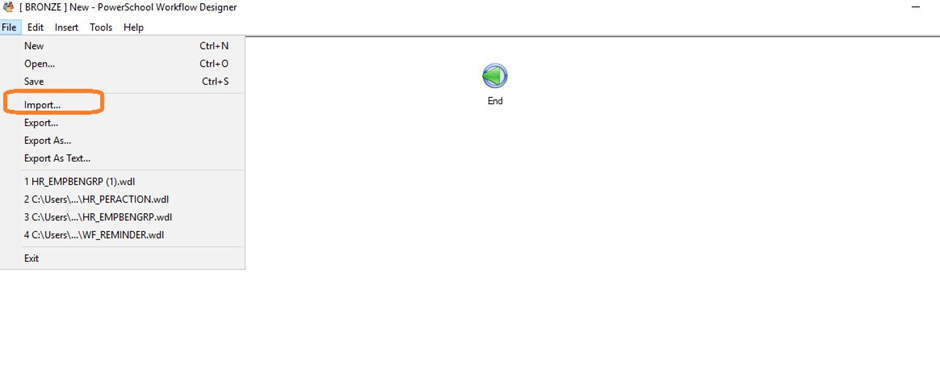
Step – 3
-
Edit the model properties and set the status as 'Active' and update the version and Save.
Note - The version should be changed to n+1 as the inactivated version.

FAQ
1. Do we need to set Model.ModelId and Model.CreateSeparateTraceFile for every workflow?
No, these need to be set only once per workflow model. If your model contains multiple C# activities, set these properties in the first activity. Setting them in every activity is redundant and can lead to maintenance issues.
2. What’s the difference between DirectFetch and GenericBT20Object?
-
DirectFetch: Preferred for performance and flexibility. It bypasses BT20 object creation, reducing overhead and cleanup.
-
GenericBT20Object: Useful when you need to include uncommitted data from previous activities. It reflects in-memory changes not yet committed to the database.
3. Which method is recommended?
DirectFetch is generally recommended for its speed and simplicity, especially when working with joins. Use GenericBT20Object when you need to access uncommitted data within the same workflow.
4. Should we always call Commit() after update/insert/delete operations?
Not always. Data is typically committed automatically when the model completes successfully. However, calling Commit() explicitly after a successful data operation can help ensure data persistence, especially during testing or debugging.
5. What does ClearErrors() do?
ClearErrors() clears any errors or warnings raised by business rules during data operations. This prevents previous errors from affecting subsequent operations. However, it does not guarantee success for future operations, which may fail due to their own rule violations.
6. Does SetInstanceData() update the Change/Life count in the workflow instance?
No, SetInstanceData() only updates the instance's blob content in memory. It does not affect the wf_instance table or increment the Change/Life count.