How to Load Payroll History
Unload payroll history into a spreadsheet. You need the following information:
- EMPLOYEE ID
- TYPE or DEDUCTION number
- AMOUNT
Important: Format the Employee ID column to TEXT prior to importing into EXCEL.

Use FIND/REPLACE tool in EXCEL and change any old deduction names/types to the new BusinessPlus CDH.
Fix the Employee ID to match BusinessPlus employee ID (if applicable).
Save and rename the file to (for example) HSTFILE.
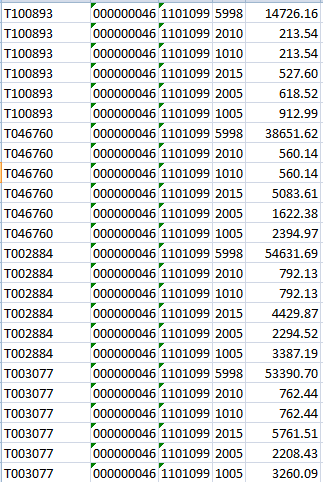
Prep the new file for upload. The upload will require the following columns in this order:
- ID
- NUMCD
- PERIOD
- CDH
- AMOUNT
Add the NUMCD and PERIOD columns to the spreadsheet. Format ID, NUMCD, PERIOD columns as TEXT. Format AMOUNT as number with 2 decimals.
Format and set the COLUMN WIDTH for each column:
- ID 12
- NUMCD 9
- PERIOD 7
- CDH 4
- AMOUNT 10
Find a generic paystring num-cd to use for the upload.
Create a pay period for the upload. Use copy/paste to copy an existing period and remove the Paid flag.
- Period = YY 01 MM 9 (where 9 will be used as a specific sequence for YTD conversion data)
- Period Code = 'YTD'
- Period Type = BLANK
- Remove the PAID flag (if needed)
Add the Num-code and period to the spreadsheet. Copy information down all employees in worksheet. Remove the Headers. Final HSTFILE should look similar to this:

Save spreadsheet (without headers) as HSTFILE.prn.
- File Name: HSTFILE
- Save as Type: Formatted Text (space delimited)
Log in to the BusinessPlus Application server and go to the \admin\data directory.
Copy/Paste the new HSTFILE.prn into the directory.
Remove the .prn extension.
From the Dashboard, All Tab, Pad the file to 512 using command
Delete any payroll history information previously rolled into this period (if this has been repeated)
Run PYUTLH to load the HSTFILE.
- Period: Period created above
- Check Date: This is the date the records will be posted in accumulators.
- Printer: ARCHIVE
Review Error Reports in Documents Online. Fix if needed.
Verify Payroll History (PYUPPH).
Recompute accumulators (PYUTRA).
