Submit New Course - PD Instructor
There are three ways to add a course:
From the "Submit New Course" link in the Instructor/Facilitator menu.
From the Course Definition page by clicking the "Add" button.
By accessing the PD Course Definition page directly using the BusinessPlus menu mask HRPDUPCD – the last is administrator only.
The first and second way will bring you to the same page to add a course.
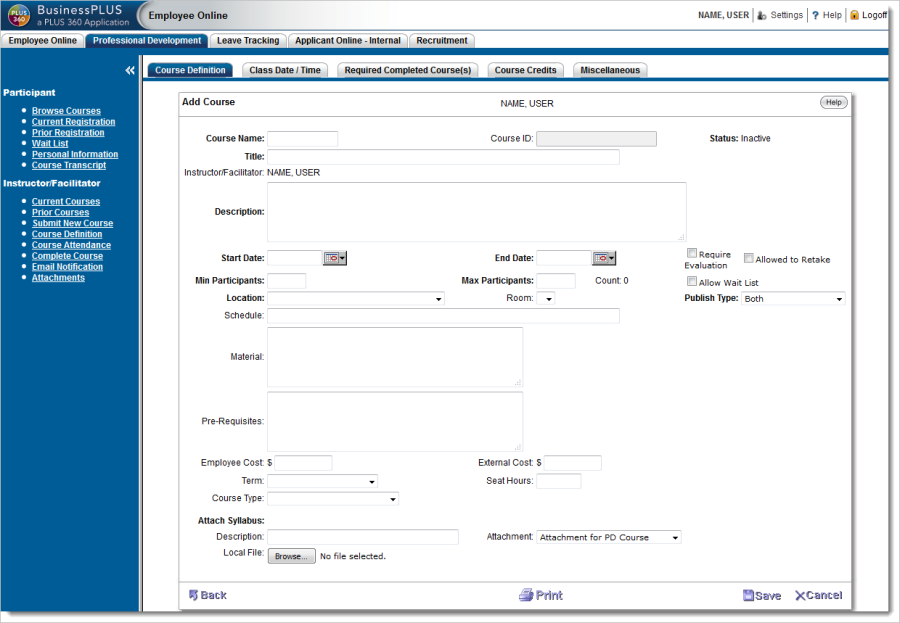
The instructor enters all of the relevant information for the course definition. Required fields are:
Course Name
Title
Description
Start Date
End Date
Min(imum) Participants
Max(imum) Participants
Location
Publish Type
To navigate back to the Course Definition list page without saving, select "Back." After completing all required fields, select "Save" or press "Enter."
When an instructor creates a course from the Web, it is created with an Inactive status. A course can be set to Active status in two ways. The first is from within the Workflow Task List. Here an approver (typically the PD administrator) needs to review the course and either accept or deny the request. See Workflow documentation for more information on the task list. Upon acceptance, the class is automatically set to Active.
The second way is within the BusinessPlus PD Course Definition (HRPDUPCD) page. There, an approver reviews the course and changes the status to Active.
Once this process is completed, the course will display online as Active and participants are able to register. The instructor will view it as Active in the Course Status column on the Course Definition page. On clicking "Save," from the Add Course window, the page automatically moves the instructor to the Class Date / Time tab. When not in Add mode, the Instructor can select the "Class Date / Time" tab to update the Class Date / Time details.
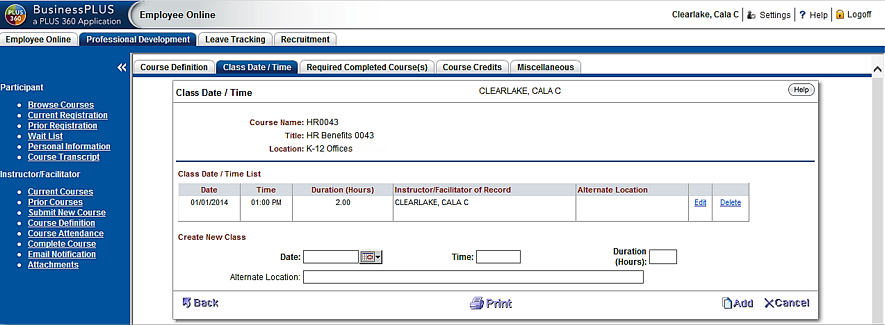
To create a new class, enter the Date, Time, and Duration. Time can be entered in different formats. For example, "10" or "10a" or "10aM" will be converted to "10:00 AM." Similarly, "10:15 PM" or "2215" or "1015p" or "1015pM" will be converted to "10:15 PM." The Alternate Location is optional. Select "Add" or press "Enter" and continue until each class is defined.
The Instructor/Facilitator will receive a message alert in the event a course has facility conflicts with other Active or Inactive courses. This will avoid scheduling overlapping courses by the same Instructor/Facilitator and/or for the same location on the same date and timeframe.

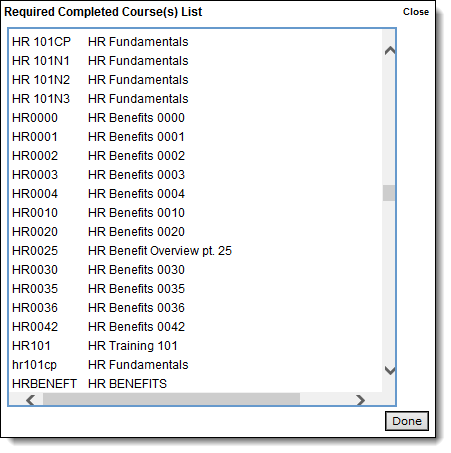
To add/modify Required Completed Course(s) that must be completed before taking a course, select the "Required Completed Course(s)" tab. PD courses will be listed here. When an applicant registers for a course, verification will automatically occur to ensure the applicant has completed the selected Required Completed Course(s).

To add a new Required Completed Course, select the lookup box next to Select Course Name to see a listing of all courses created in PD. Highlight the course you would like to select and click "Done" in the lower right-hand corner of the page. The course will display in the Select Course Name field. To complete the association, select "Add" or press "Enter."
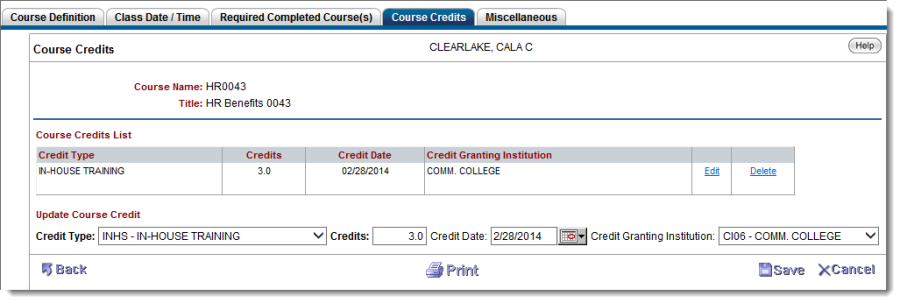
To add/modify credits for a course, select the "Course Credits" tab. Each credit will be listed here. To add a new credit, select the credit type from the drop-down and enter credits. Credit Date and Credit-Granting Institution are optional. Select "Add" or press "Enter" and continue until every credit(s) is defined. The page will verify that no duplicate Credit Types are selected.

To "Edit" or "Delete" a Course Credit from in the list, click the appropriate link. "Edit" will load the course information into the Create New Course Credit section, and the name will change to "Update Course Credit." Once finished, click "Save" or press "Enter" to update the course credit.
To navigate back, click "Back" on the lower left-hand corner of the page. To add/modify miscellaneous items for a course, select the "Miscellaneous" tab. To add a new item, select the "Type" and relevant Item(s) from the drop-downs. Comments are optional. Select "Add" or press "Enter" and continue until each type(s) is defined.
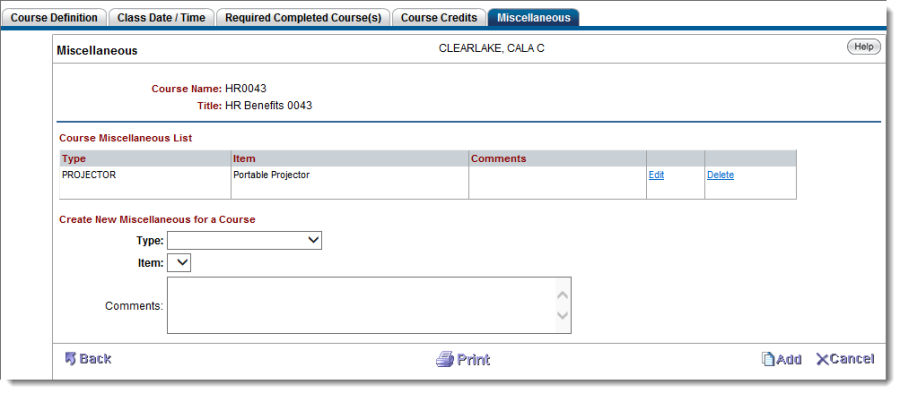
To navigate back, click "Back" on the lower left-hand corner of the page.
