Creating an AR or CR Set Via a Flat File
A BusinessPlus AR or CR set(s) is generated via a flat file by following a two-step process where (1) data is loaded into the interim table ar_int_dtl; then (2) interface data is used to create a set.
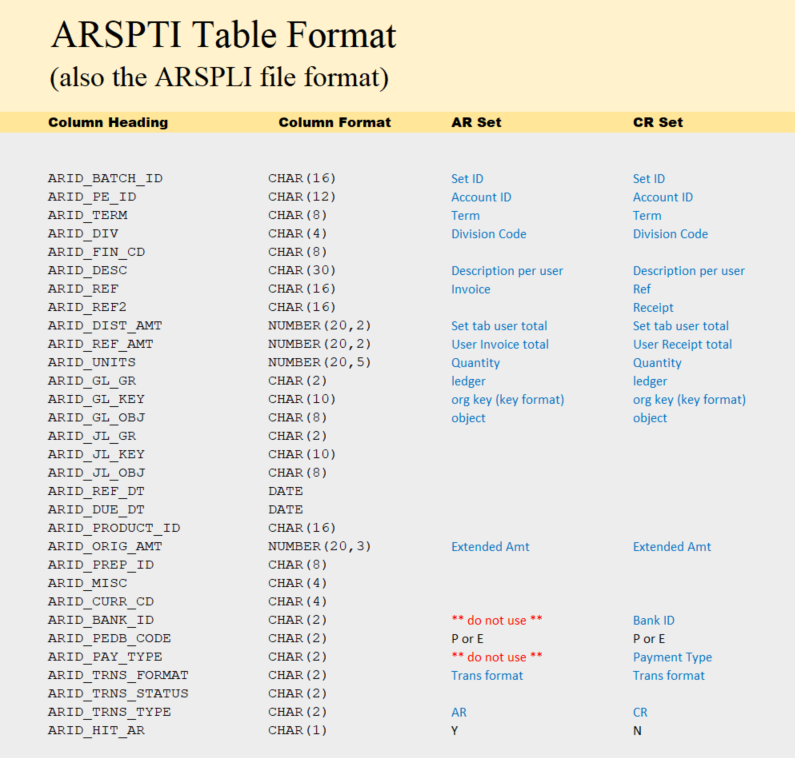
Begin by placing data into the ar_int_dtl table via the Load Interface File (ARSPLI) utility. ARSPLI places content from a comma-delimited file directly into ar_int_dtl. Make sure the data in the ARSPLI file is configured for the specific columns per the column headings. Also, the data elements to be loaded should match a field's data type and may not exceed the maximum field size. The table holds multiple columns as identified in the ARSPTI Table Format image below.

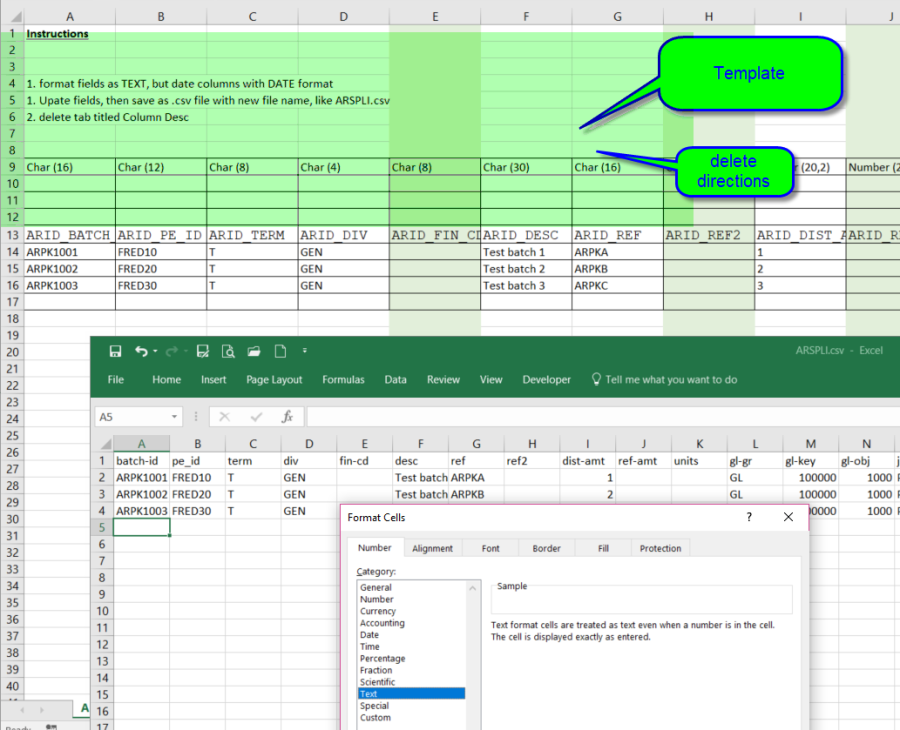
Prepare the template and refer to the instructions below for a typical run of ARSPLI, which assumes the user will be using ARSPLI to place data into ar_int_dtl. Thus, prep data as noted, then use the Load Interface File (ARSPLI) utility to load data to ar_int_dtl.
After running the utility, view the data loaded using an SQL query to ensure data is parsed correctly, complete, and the various required fields are present. Redo and update the file as needed until the data is as desired. The two steps are described in more detail below.
Additionally, the process may also be customized with the help of NU Common Codes. The Common Codes may configure the set to post immediately, use a select printer, and/or route records with invalid accounts to a suspense account.
Common codes that customize ARSPTI features:
- ARDS/AR240C - Run process in Test or Debug mode, be sensitive to the batch status, to distribute created batches automatically and to specify certain printers. Enable ability to append records to the ar_int_dtl table rather than overwriting.
- GLEM/REDIRECT - Notify specific users when account numbers have been redirected to suspense accounts as defined on the GLJE/REDIRECT common code. Up to five users may be notified.
- GLJE/REDIRECT – Define suspense account information.
Step 1: Load Interface File (ARSPLI)
To load records into the ar_int_dtl table using ARSPLI:
- Create a template.
- Identify the columns that will be loaded from the list below, ARSPTI Table Format
- Each row in the Excel file will create a BusinessPlus record providing the data elements follow a valid column format.
- Load the file and then using SQL, query the ar_int_dtl table to view and verify data is ready to be interfaced.
- Parsing is correct, especially dates and amounts.
- Fully populated content and readable.
- Record counts and system totals are as expected.
- SAVE the template with the newly added data (optional)
- Remove the extra rows holding instructions or extra tabs
- Leave Column Headings and a row for each line item for the Set's invoice or receipt.
- Excel files saved as .csv can contain only 1 tab; no special name is required for that tab.
- Select all text fields (Ctrl + a), right-mouse click, and Format Cells to TEXT.

- Reselect date columns only and format in the desired date format.
- Select the range of cells holding data that will become BusinessPlus set data. Data in the range will be loaded to the interface table ar_int-dtl.
- select the range of cells to load to ar_inl-dtl including first row containing Column Headings
- click Page Layout
- Print Area
- Set Print Area
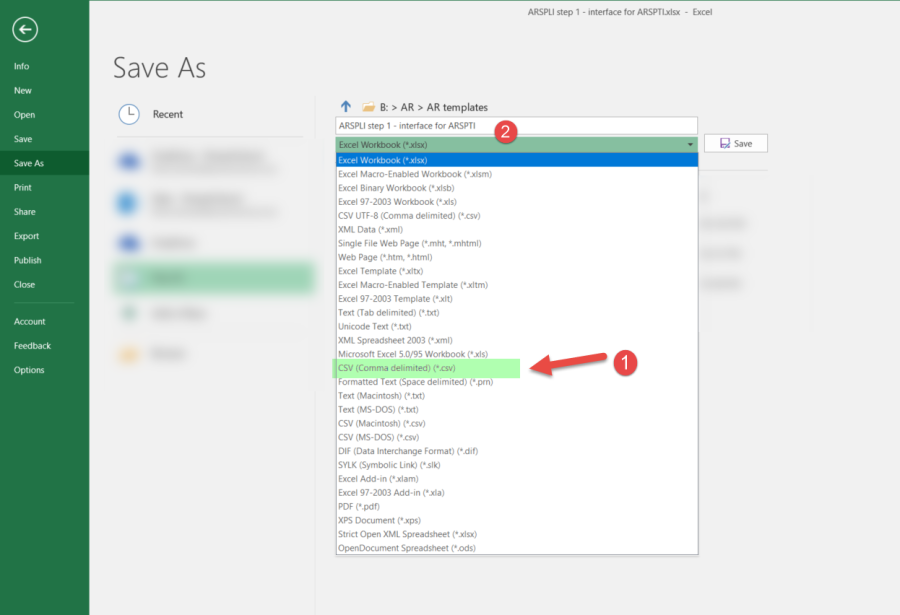
- Then click FILE > SAVE AS
- Modify the file type and file (marked #1 and #2 below)
- Format to use is Comma Separated Value (csv)
- Update the file name to the desired name.
- Save the file in the desired location on the applicable app server.

- In BusinessPlus, navigate to ARSPLI and enter the name of the file and submit. Leave the ARSPLI.csv file open while loading the file so any edits can be done, saved, and repeat loading process until the data loads perfectly.
- Once job is complete, in Admin Console, view data that was loaded using an SQL query (optional). A simple query will show the data loaded that can be verified as complete and accurate.
Parsing
Date format
Amounts
Counts
Descriptions are complete.
- Required and desired data is loaded to the table
- Example of a simple query is "select * from ar_int-dtl"
- All data showing in the query will make invoices and receipts within a Set after running ARSPTI.
- After running ARSPTI, the table will be ready for more data
- If ARSPTI is not ran immediately, append more data to the set or add additional sets.
Step 2: AR Table Interface (ARSPTI)
- Click submit and data within the ar_int-dtl table will be fetched and placed in either AR or CR sets.
- Data within the ar_int-dtl table tells ARSPTI how to organize and interface the data.
- Process the data in the usual manner.
