
Employee Setup
Washington State Retirement Info (PYRERRWA01).
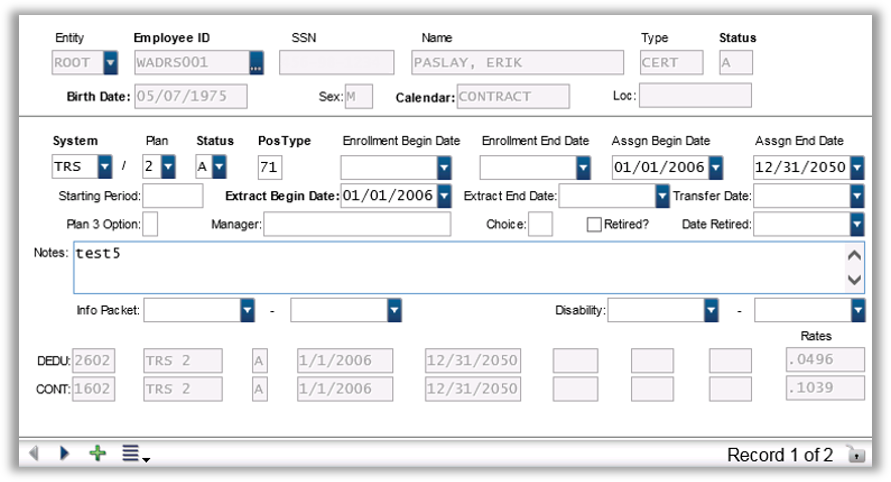
Entity: Entity code of the employee.
ID: Employee ID. Employee Master information will display in the screen once saved (SSN, EMPLOYEE NAME, TYPE PY STAT, BDT, SEX, CNTHRS, CLD, LOC). The DRS system does not support multiple IDs with the same social security number.
SYSTEM/PLAN: Enter the system and plan as defined in the Plan Definition screen and as it applies to this employee. Valid K12 codes are PRS, TRS, SRS.
Status: Status of this record. “A” for active, “I” for inactive. A “G” or “F” can be entered into this field in place of an “A” and those codes will carry over to the extraction. E.g., if a “G” or “F” is entered into this status field, it will replace the Status Code of all Entries (except B) sent to DRS.
PosType: Position type. This field populates the type code on the employment information record (the “E” record) in the DRS file format. REGULATORY REPORTING GUIDE
Enrollment Beg: Enter the Eligibility Start Date to be reported to DRS. This date range is used only for DRS reporting and is the date transmitted on the “E” recorded regarding DRS enrollment.
Enrollment End: Enter the Eligibility End (termination) Date to be reported to DRS. This date range is used only for DRS reporting and is the date transmitted on the “E” record regarding DRS enrollment. Leave blank for new hires.
Assgn Beg/End: Enter the assignment begin and end dates. This date range will be the begin/end dates on the payroll deduction and contribution assignments in payroll and determine the range of what is considered PAID to DRS. If the end date is not known (new employees), put in a date in the distant future (e.g., 12/31/2050). For terminations, enter the end of the contract year: 06/30/yyyy or 08/31/yyyy. That way, the contribution and deduction assignment is still active if any late time sheets or retroactive pay are processed after the payoff month.
Starting Period: This is the period in which payroll data should start being looked at by the DRS extract. Any payroll data that occurs in this month or after will be included in the extract. The field is also updated by the Balance Forward (PYRERRWAUTBF) utility as a starting point for determining unreported earnings and confine its search to those pay periods (including supplemental periods) that were paid in the Starting Period or later. New hires should be blank. Re-hires should be the Year and Month they restarted work. If there is balancing information in the RETWARPT screen (PYRERRWA05SU), it will also be included in future extracts.
Leaving the Starting Period blank can be useful in special circumstances (late starts). The Extract Process will go all the way back to the beginning of the initial extract period and determine: 1) what has been earned to date, 2) what has been paid to date, 3) what has been reported to date. Whatever has been paid to date but not reported will be reported in the current reporting period.
If there are any earnings history in the employee’s Reported Table (PYRERRWA05SU), it will need to be cleared out to extract ALL records.
Extract Begin Date: Enter the extraction begin date. This date represents when earnings should start to be considered pertinent to DRS. This should represent the earliest possible date reportable to DRS pertaining to this general information screen. New hires should match the Enrollment Begin Date. Additional screens which reflect a status change (for instance, a substitute employee placed on contract) should have an extract begin date on the first of the month in which the status change occurred. If an employee’s position becomes ineligible due to a reduction in hours, the new extract begin date would be the first of the month following the status change.
Extract End Date: Enter the extraction end date. This date represents when earnings should end and not be reported to DRS. Enter 12/31/2050 for new assignments. Enter the last day of the payoff month for terminations.
Transfer Date: Enter a Transfer Date to a new plan. Also use this field for the “choice” date when creating new employees. This date will automatically create a transfer record for the employee when the Create File Image (PYRERRWA04) Process is run.
Plan 3 Option: For TRS/SRS/PRS 3 assignments, enter the option (“A” through “F”) as defined in the DRS Employer Handbook. The screen will automatically try and enforce the 90-day rule by changing the option to “A” if the time has elapsed and no option is selected. This functionality can be altered by using common code TDHR/RETWA Associated Description 2. Entering “ONLY WARNS” in this common code will alter the screen behavior so it will give a warning that can be ignored, allowing the user to leave the option unselected after 90 days, if necessary.
Manager: Enter the manager code as defined by the DRS Employer Handbook. Typically, this is either SELF or WSIB (all CAPS).
Plan Choice: Enter the valid Plan Choice Code as defined by the DRS Employer Handbook that will appear on the Plan Choice/Transfer record.
Retired? If the employee is retired, enter “Y” in this field, as well as the retirement date in the following field.
NOTES: Informational notes may be entered in the notes block.
Info Packet: Informational dates exist to indicate when the employee received retirement information.
Disability: Enter the disability dates as necessary.
DEDU/CONT: Once the user hits enter/save, the screen reads the deduction and contribution for this plan from the Plan Definition screen, creates the assignments in payroll, and echoes the assignments in the center of the screen. This information can only be changed by either altering the Plan Definition screen or assigning a different System/Plan to the employee.
Former Info: Shows information from a prior changed assignment. Employees should not have overlapping date ranges. Only one plan may be active at a time. If an employee changes plans, the user should close out the old plan with an ending date in both the extraction end date and the assignment end date. It is important to create a new screen and to not simply change the existing screen. Other DRSM processes expect to find historical information it may need in the recalculation of deferments. Also note that the assignment dates determine the date range of paid items and the extraction dates determine the date range for earnings.