
Timecard Online allows configurable panels to be assigned at the group level. Panels are simply blocks of items that display together and work together logically within the application.
Each group can have its own Employee and Leave Panels. The Position panels are further configurable by position. Each position or range of positions within a group can be assigned a different panel. If one position requires Work Order, but another does not, two different panels can be built and assigned accordingly. Each position panel has an accompanying detail panel.
A timecard session is presented to the user as a set of various panels working together as a group and configured for the type of employee logged in. The Timecard Online configuration settings identify which panels are used and by which employee groups. There are standard panels (and custom panels if available) placed in standard directory structures for the application to reference.
Panels are of the following types:
-
Employee Panel – Displays basic employee information and provides the choice for which pay period is being entered.
-
Leave Panel – Displays available leave balances for eligible employees.
-
Position Panel – Provides for multiple, one-week grids for entering time on a daily basis. Days of the week are displayed across the top and possible hour codes are displayed down the left side. Employees with multiple positions will select the correct Position tab at the top of this panel and enter hours in the appropriate cell in the grid for correct date and hour code.
-
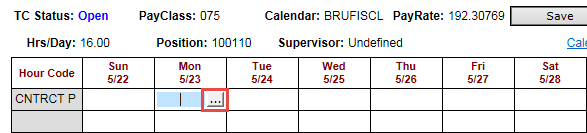
Detail Panel – Optional Detail Panels may be specified for employees who must enter more detailed timecard information, such as Account Numbers, Work Order Numbers, Reason Codes, Comments, etc. Any Detail Panel is accessed from a specific Position Panel cell (Position/Date/Hour Code).
-
Verify Panel – This panel displays an acknowledgement by the employee that his/her timecard is true and accurate. The text of that message is defined by the client. This is an optional feature.
Below are examples of default panels that are installed with Timecard Online.
Employee Panel
Customize Dashboard > Timecard Online tab > Group Settings > Employee Panel
Control Path: PanelControls/EmployeePanel.ascx

Page display:

Leave Panel
Customize Dashboard > Timecard Online tab > Group Settings > Leave Panel
Control Path: PanelControls/LeavePanel.ascx

Page display:

Position Panels
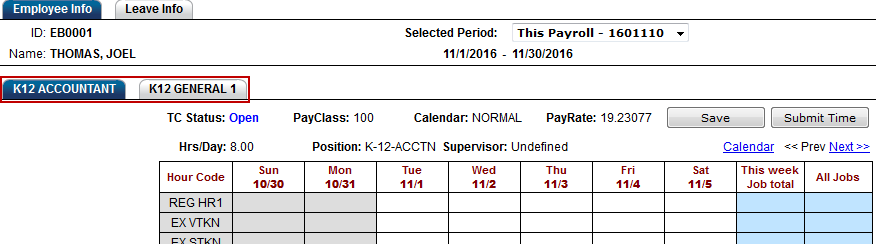
Below the Employee Panel in Timecard Online are additional tabs identifying the various positions assigned to an employee. The main grid below the position tabs is the Position Panel.
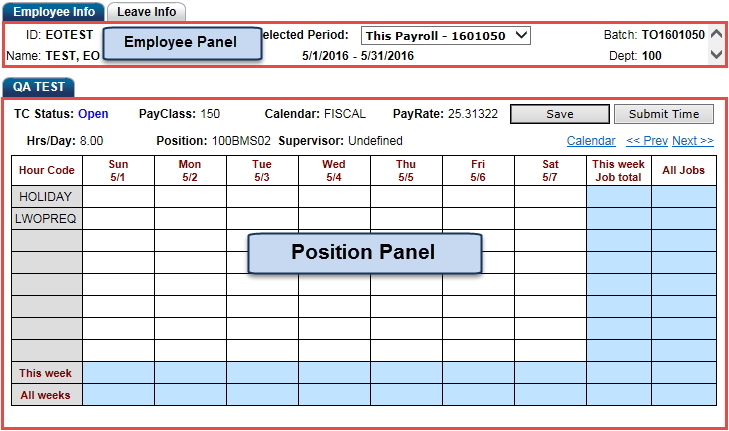
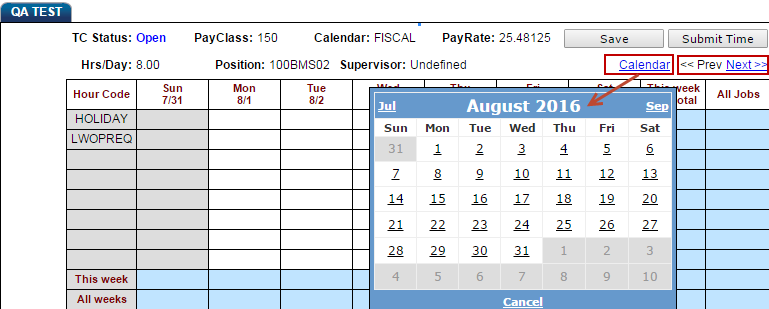
The Position Panel is specific to the Position tab that is highlighted. It displays one week at-a-time for a given position. Users navigate between weeks by the "Prev"/"Next" links or by selecting the calendar drop-down and choosing a date.
Users navigate among various Position Assignments by selecting one of the Position tabs.
At its simplest, timecard entry requires the user to choose the correct Position, Date, and Hour Code and enter a number of hours in the correct cell.
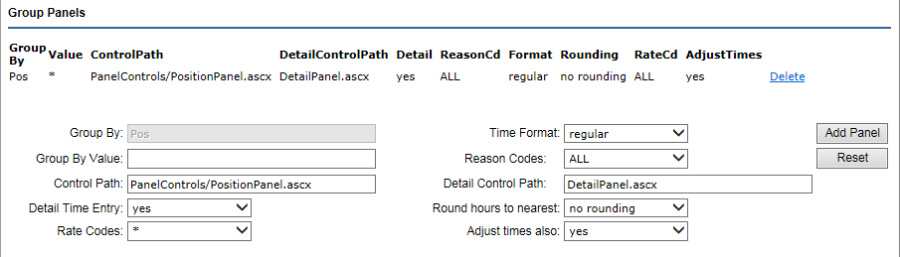
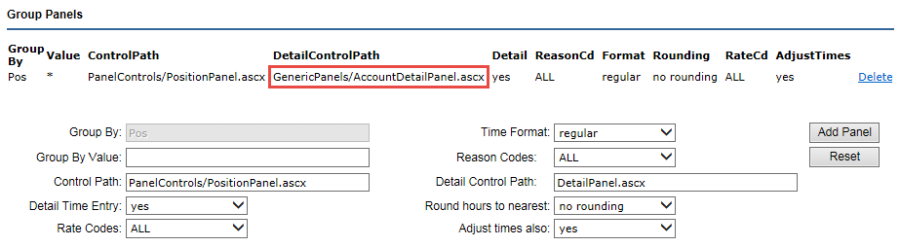
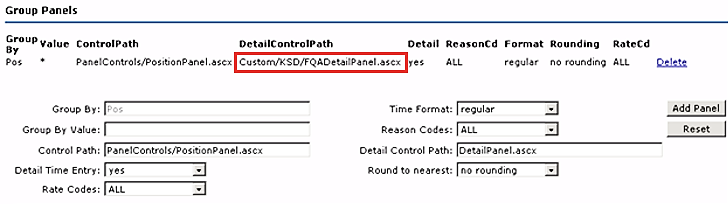
Different panels are defined on the server. In this example, the Position panel is defined using Customize Dashboard > Timecard Online tab > Group Settings > Group Panels.
The Control Path for Position panel: PanelControls/PositionPanel.ascx. The .ascx files are located on the 7i server in the ifas7/Timecard/PanelControls directory.
Page display:
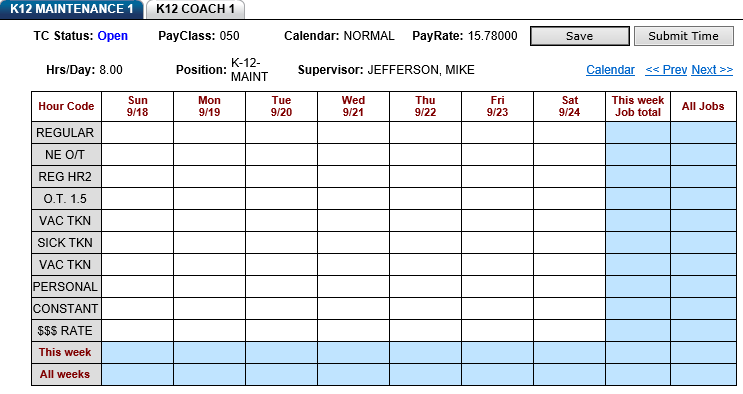
Note: The supervisor in the "Supervisor" field of the Position Panel is defined on the PCN/Position Definition (HRTBPC).
Detail Panels
Detail Control Path
The Detail Control Path is relative to the location of the Position Panel. The Detail Panel can either reside in the same directory on the server as the position panel or the path to the correct directory can be specified.

Optional Detail Panels may be specified for employees who must enter more detailed timecard information, such as Account Numbers, Work Order Numbers, Reason Codes, Comments, Time Clock In/Out Times, etc. Each Position Panel may have a different associated Detail Panel appropriate for the type of additional detail information as needed.
Any Detail Panel is accessed by clicking on a specific cell on a Position Panel. If there is a Detail Panel configured, an ellipsis will appear that allows the user to open the Detail Panel.
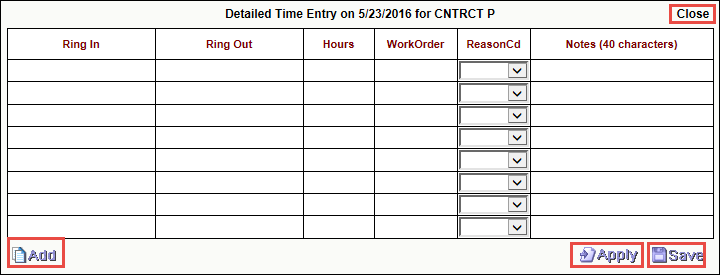
Apply – this button will save any changes and remain on the Detail Panel.
Save – this button will save any changes and exit the Detail Panel.
Add – will create additional open lines when the Detail Panel grid is full.
Close – will exit the Detail Panel without saving any changes
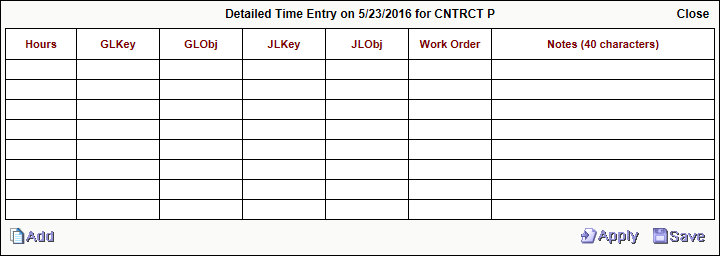
Account Detail Panel
Detail Control Path: GenericPanels/AccountDetailPanel.ascx
Page display:
Ring IN/OUT Detail Panel
Group Setting
Detail Control Path: GenericPanels/RingInOutDetailPanel.ascx

Page display:
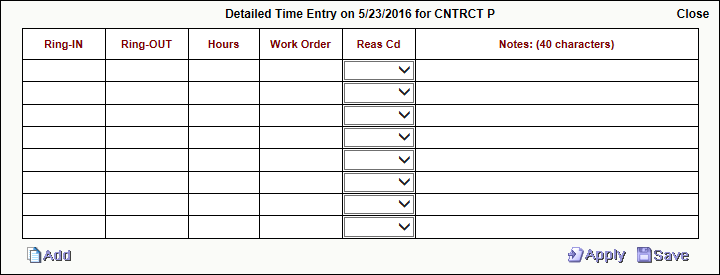
When entering time, use a colon to separate time components (i.e., 12:00 PM).
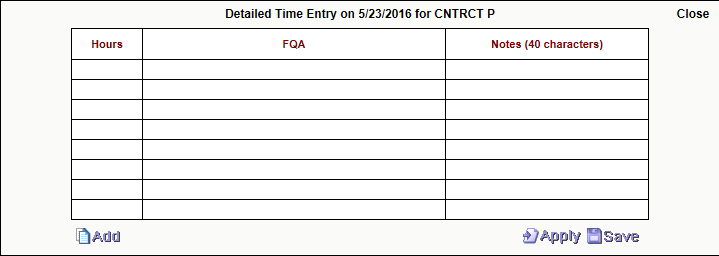
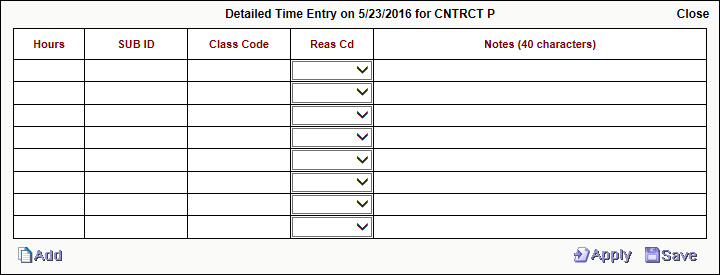
FQA Detail Panel
Detail Control Path: GenericPanels/FQADetailPanel.ascx

Page display:
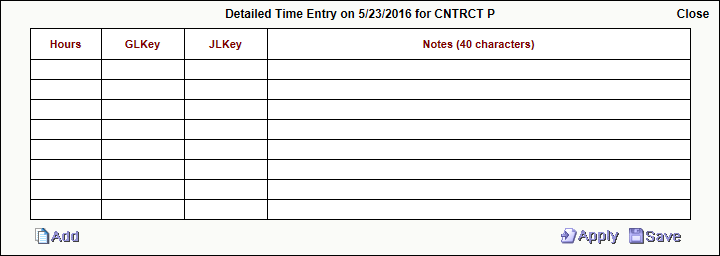
GLKey/JLKey Detail Panel
Detail Control Path: GenericPanels/JLKeyDetailPanel.ascx

Page display:
Teacher/Substitute Detail Panel
Detail Control Path: GenericPanels/TeacherSubDetailPanel.ascx

Page display:
Custom Detail Panels
A custom Detail Panel can accept up to three Rate Codes for each detail timecard entry. Each of these rate codes will potentially have the effect of modifying the employee's standard hourly rate of pay. These rate modifications will be generated within the Timecard Interface process and not by the Timecard Online pages. When the user selects from the drop-down box the codes are displayed, as they click on a code it "echoes" the Short Desc for the Differential Code selected. Differential Rate Codes are defined on PYUPPC with category IFPYRATECD.
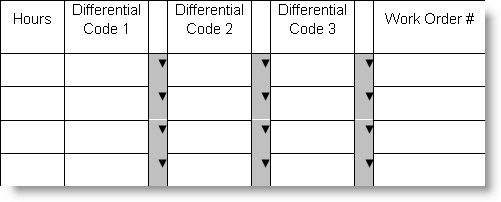
Custom Detail Panels require a subdirectory to hold custom folders of client-specific panels, separate from the "GenericPanels."
Detail Control Path example: Custom/clientname/clientname1DetailPanel.ascx
Verify Panels
Global Settings
When an employee has entered all timecard information for a pay period, he/she will submit the entries for review and approval by a supervisor. Typically, clicking on the Submit button brings up the Submit Verify Panel, which requires a second "submit" step to acknowledge the message about truth and accuracy of the data.
The name will be the same for all Verify Panels. For each different location of the Position Panels you are using, the Verify Panel file will also need to reside. This will allow the position panel to open the verify panel control.
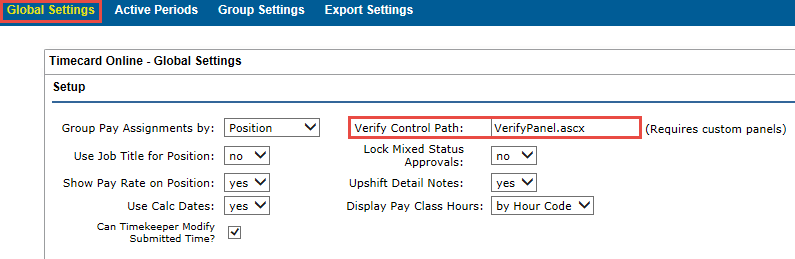
Access the global settings for the Verify panel here: Customize Dashboard > Timecard Online tab > Global Settings.
Control Path: PanelControls/VerifyPanel.ascx
Group Settings
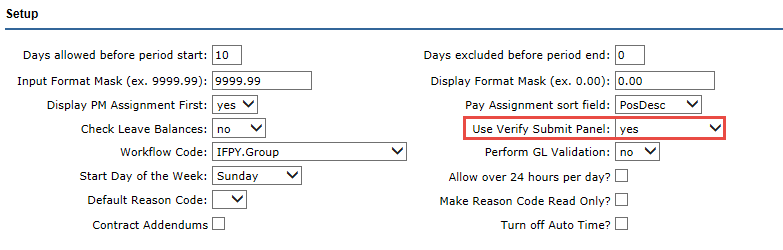
On the Group Settings page, set "Use Verify Submit Panel" to "yes" to enable the use of the Verify Panel for each group.
Page display after clicking the Submit button:
